Today is the day! WOO HOO...Today the
SAVVY PROJECTS BLOG is hosting a HOP! This hop is for anyone to participate in and all you have to do is create something and add a link to the inlinkz tool below and there you go...Instant hop...
The theme for this hop is "Stamping on Fabric" and I LOVE stamping on fabric. Most of you may have already seen my tutorial for the
denim soda bottle Corset that is displayed above and that was quite fun to make. This time, I decided I would do something a bit different so I made a handmade PURSE! YES, you got it...A REAL professional looking "CUTE" purse! I didn't have a pattern and just kinda went with the flow (as I usually tend to do) and started creating.
Here's a picture of the supplies I used to create this purse (minus my sewing machine, some batting, interfacing, some ruffled trim ,and the handle parts)
So, what you have here is cream colored cotton fabric (I painted on this),
Lotsa Dotsa stamp set, some button patterned fabric from Joanne's, coordinating acrylic paints, paint brushes, a variety of Nestabilities Circle dies, Memento Ink, StarDust Stickles, StazOn, a pencil and a Sharpie.
Day 1:
Step 1: Cut a piece of 12x12 cream fabric (Yes, It's scrapbook size!).
Step 2: Paint this fabric with (white) acrylic paint. This will create a "canvas"effect.
Step 3: Stamp "canvas" using Memento and StazOn ink.
Step 4: Use a variety of Nestabilities dies to trace random circles on the stamped fabric.
Step 5: Paint circles with coordinating acrylic paint.
Step 6: Use Sharpie pen to trace around painted circles and make "button holes/threading".
Step 7: Apply StarDust Stickles to all "buttons" and let dry.
Day 2:
Step 1: Cut four pieces of 12x15 patterned fabric
Step 2: Cut two pieces of 4x3 patterned fabric (these will hold the handle)
Step 2b: Cut two pieces of ribbon (these will be part of the handle)
Step 3: Cut four pieces of 12x12 fusible interfacing
Step 4: Cut two pieces of 12x12 natural batting
Step 5: Iron interfacing onto patterned fabric. Fold remaining three inches of patterned fabric over interfacing edge and iron flat.
Step 5: Cut one piece of ruffled trim approx. 12 inches and one piece of ribbon approximately 16 inches.
Step 6: Fold stamped fabric so it is approximately 12x 8. Sew ruffled trim along folded edge then adhere ribbon with Zip Dry glue.
To assemble the Purse "Sandwich layering"
Step 1: Layer batting, patterned fabric (pattern facing up), patterned fabric (pattern facing down) and stitch around three sides but not the "folded edge". Turn inside out and iron flat.
Step 2: Layer batting, patterned fabric (pattern facing up), stamped fabric, patterned fabric (pattern facing down) and stitch around three sides but not the "folded edge". Turn inside out and iron flat. The paint and the glitter will not be affected.
Step 3: layer both "sandwiches" on top of each other and stitch along one edge.
Step 4: Attach the patterned fabric/ribbon with the metal clasp along the sewn edge (inside).
Step 5: Close the fabric sandwich again and stitch around the bottom and the other side.
Step 6: Attach the patterned fabric/ribbon with the metal clasp along the sewn edge (inside). Make sure to stitch the handles securely as they will carry all of the load of the purse.
Step 7: Flip pattern inside out to reveal purse design. Attach strap. Add some ribbon to the patterned fabric straps for added decoration.
That's it! I hope I didn't forget any steps! I think I will be using some hot pink satin fabric I have left over from a dress I made for my niece to create an insert on the inside...just to make it completely FABULOUS!
Here are some pictures of my completed purse:
So this is the final purse...SO cute huh?
This is the handle treatment I went with...Hopefully it will be sturdy enough for the goodies inside!
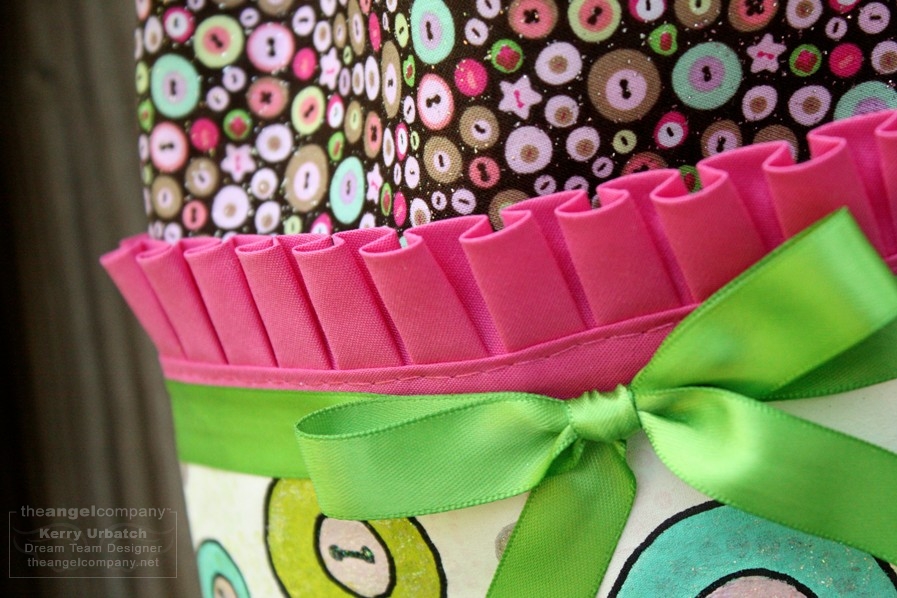
See the ruffles, the stamping and the adorable button fabric???
OOHHH how I LOVE ruffles!!! ")
Now, I don't profess to be a seamstress by any means! There are a few OOPSIES in this project but I won't give them away!!! So there you have it...YOU CAN STAMP on FABRIC and CREATE SOMETHING USEFUL AND FABULOUS!!!
Hope you enjoyed this little project. I'll be working on another purse soon with a different handle and THESE deelish fabrics...What stamp set should I use this time????